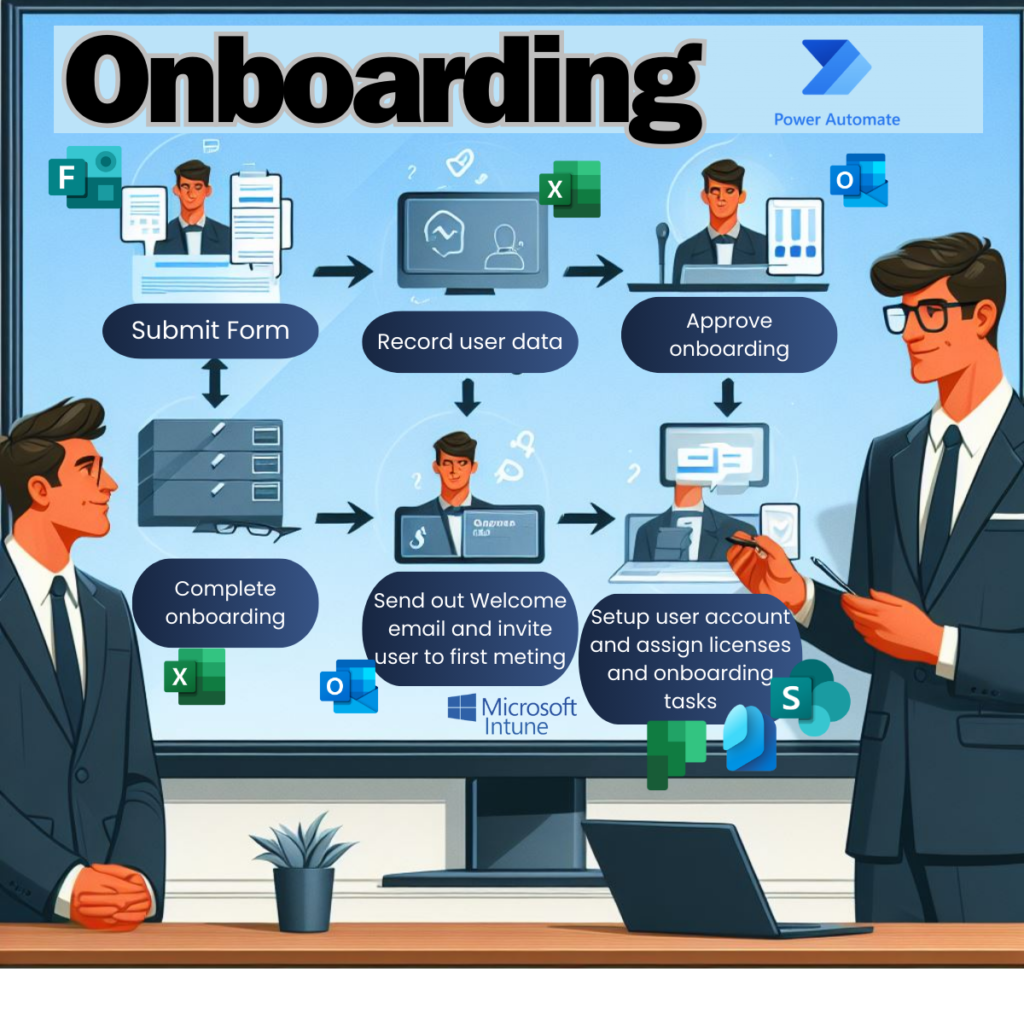
Onboarding new employees can be a time-consuming and repetitive process for HR departments. However, with the help of Microsoft Power Automate, many of these tasks can be automated, freeing up valuable time and resources for more strategic projects, remember, a good onboarding process can contribute significantly to a new employee’s productivity and job satisfaction. In this blog post, we’ll explore how you can use a number of Microsoft tools/platforms along with Microsoft Power Automate to streamline some of the background onboarding tasks which can be easily setup and adapted for HR processes. Well look at how you connect to the various Microsoft resources to automate tasks including: Sending welcome emails, setting up new accounts, creating approvals and team tasks and setting up day 1 meetings. These can serve as a pre-requisite ahead of device Enrollment into Intune.
While Microsoft Intune is a great toolset for automating the configuration of your organisation devices and ensuring they are secure to work with, that’s only one part of the onboarding and offboarding process. Obviously in the enterprise environment there are many HR systems options around be it WorkDay, SuccessFactors or ServiceNow which have different back-end systems to integrate with. There are also various onboarding services which work with your HR system. An additional option available from Microsoft is Entra Identity Lifecycle Management which does a great job in automating many of the manual steps such as managing user identities, granting permissions , creating user groups and ordering equipment and sending welcome emails.
BUT and it’s a big but, these come at a price which for Entra Identity Lifecycle Management is around $7 a month per user on top of the required Entra ID premium license. So if you already have licensing available and assigned, you may want to automate this for yourself.
So how can you introduce automation yourself using Power Automate ? In this blog I want to introduce you to Power Automate Flows and help you become more efficient with those typically repeatable tasks. Enterprise HR systems now days will manage your people profiles, payroll, shiftwork and timesheets, appraisal management as well as produce reports. These options available will depend on the software of choice.
In the modern workplace world where you have your devices managed in the cloud using Microsoft Intune and Microsoft Entra you may still need to automate the following tasks:
- User Identity creation within Entra
- Group assignment
- Approval automation
- User Database updates (with automation changes)
- Email confirmations to managers, team members and the onboarding user
- Raise requests for hardware ordering
- Welcome Emails to the new employee
- Access management for company resources (using dedicated web sites)
So let’s dive into how we achieve this. First off you will need a Power Automate license which can be obtained through the assignment of a Microsoft 365 for Enterprise E3/E5 license. There is a free option called ‘Power Automate Desktop’ which only operates at the individual user level, but using this means you will not be able to share or collaborate the created flows and also means you won’t have access to built-in AI tools or scheduling. The benefit of having a Microsoft 365 E3/E5 license is that it allows you share the creation of your flows so that other team members can support the process as required.
The following steps assume you have access to Power Automate which you can log into at https://make.powerautomate.com
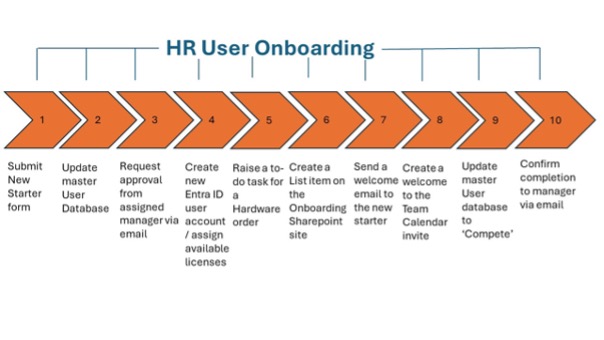
Before you embark on this route I would recommend you map out your own HR onboarding process. It’s useful if not already available to produce a diagram to depict the required actions at a high level like the one added below:
In my scenario here, I will be using some great Power Automate features including ‘Flow’ and it will use automation using connections to Microsoft Forms, Sharepoint, Outlook, Entra, Intune, Planner and Excel. As you can see this is a Microsoft based solution, however Flow can integrate with various HR systems, databases and SaaS services. This also represents an opportunity with the many subscribed companies to M365. In your environment you can make changes to connect with these to reflect your own onboarding processes.
In the example provided here I am using Microsoft Excel as the master database for new users and Microsoft Forms to create and initiate the new starter process.
Once logged in to Power Automate we start by selecting the ‘My Flows’ on the side menu and create a ‘New Flow’. In the example produced I used an Automated Cloud flow which allows you create a trigger point to initiate the flow. For this scenario I have created a Microsoft Form which can be shared with users and will be our starting point here.
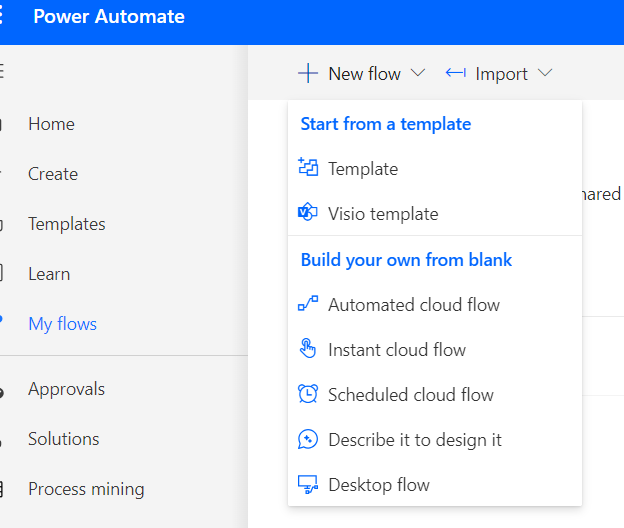
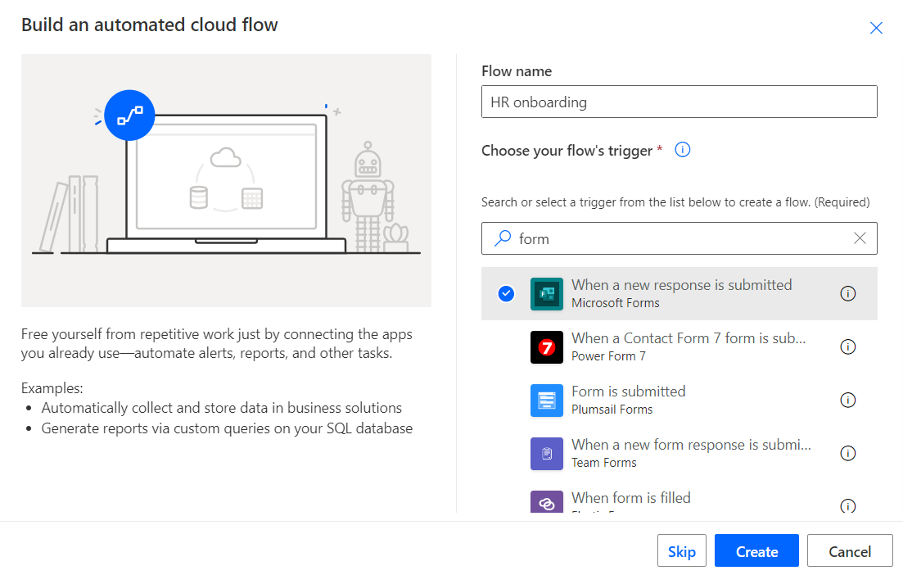
From the ‘Choose your flows trigger’ you can search for the service you want to use. Once created go in and edit the flow to start defining your automaton tasks. Your flow’s trigger will be automatically added to the dashboard.
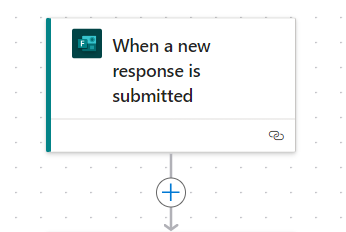
You will also see in the ‘new Designer’ page a + sign. You use this to add a new step to capture the submission details of the Form which triggers the flow. By continuing to add multiple steps going down the page your onboarding process will be created.
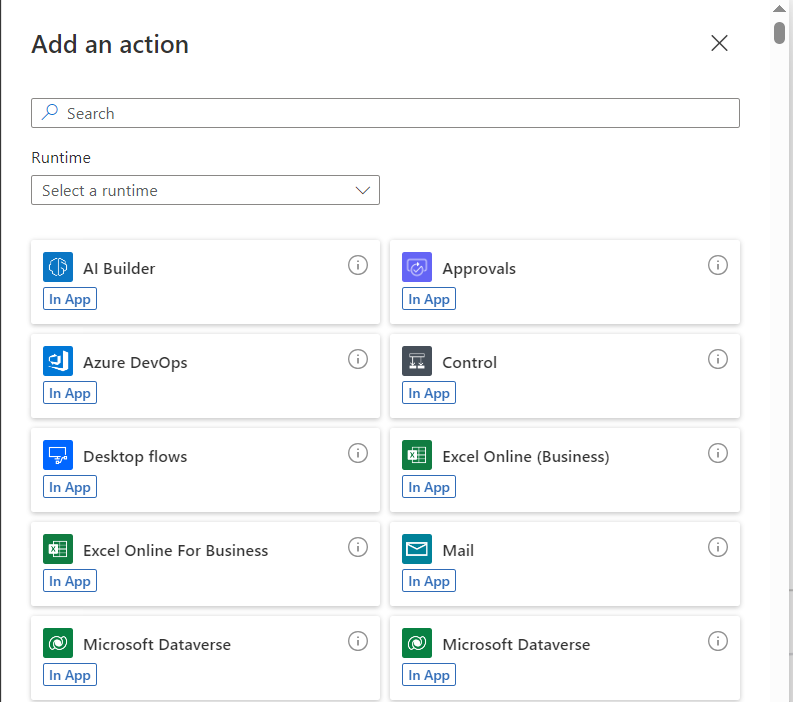
Clicking the ‘+’ option on the page allows you to search and select the action required.
Before we get into building our automation out we first need to carry out the background configuration in preparation. For this we will setup:
- Create a master Excel document to add your new users to
- Create a new Form to enter new Employee details
- Create an Entra ID group – to add the new onboarded accounts
- Setup an Onboarding Sharepoint site dedicated to new employees joining your company
- Create a new Plan using Microsoft Planner to be used to create an manage all tasks assigned to the onboarding Team
So we first need an Excel database to add the details captured from our Microsoft Form. In my example it’s a simple design but you may want to add additional fields to build out all the options you can offer.

Next, we create our Microsoft Form to allow for the first step in process starting our Flow. This will be the entry page where HR employees can enter new Employee details. You can access Forms online using your Microsoft 365 account and share the url with colleagues. Open up forms and create and design your new form.
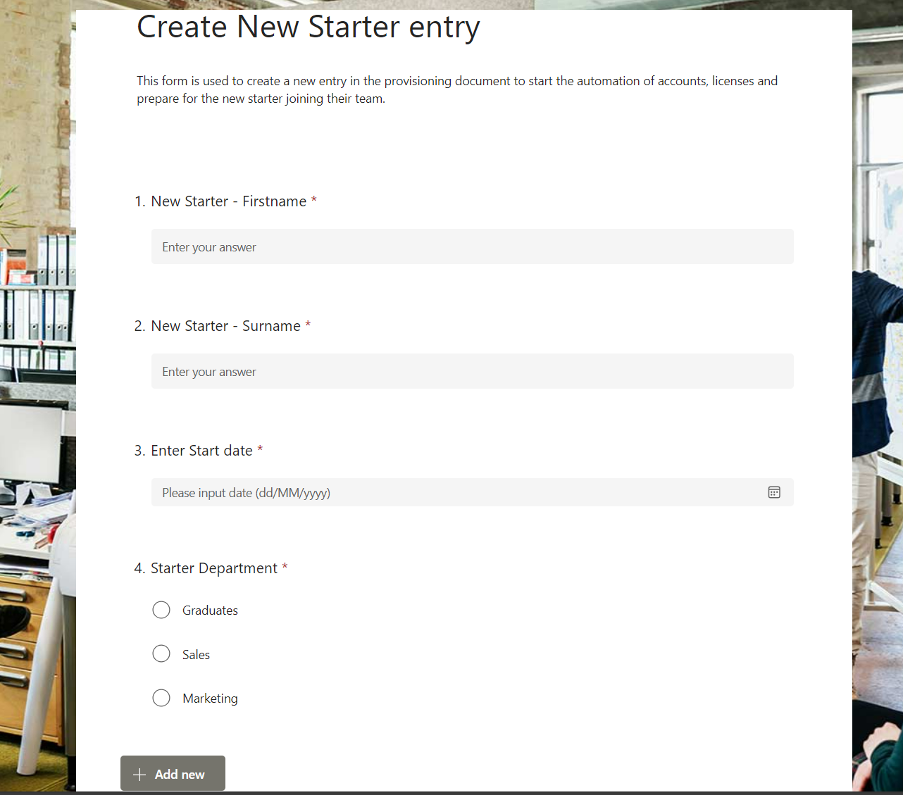
In my form you can select the department the new employee will be joining. This will make a difference within the Power Automate Flow as it will used later for creating the user account and allows us to determine who the new starter’s manager will be. I have also made every field mandatory to ensure I capture all the data.
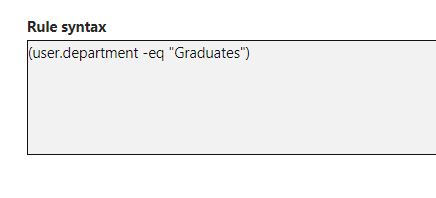
A key stage to the preparation is the creation of a new Entra ID Group within Intune. Notice from the picture, the ‘Graduates’ group is a security group that is also ‘Dynamic’. The reason for this is we want to automate the assigning of a new added account to this group based on a dynamic rule.
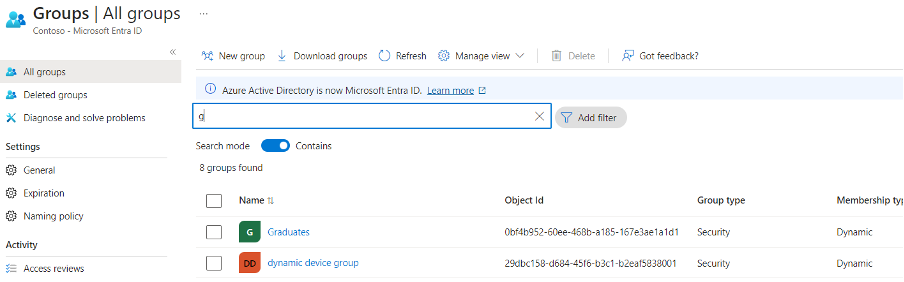
We can also dynamically assign Microsoft Intune and M365 licenses by applying these licenses at the group level. As users are added and removed from the group the available licenses are either used or made available for re-assignment. Both of these approaches automatically help automate the process we are developing here.
Naturally we are covering the pre-device onboarding process here, but once your new employee starts at the company and a Laptop/desktop has been assigned, the new starter will want to enrol their device into Intune. For this to run smoothly you will need to build out all relevant policies, profiles, configuration, security and applications and assign these to your onboarded groups as mentioned above.
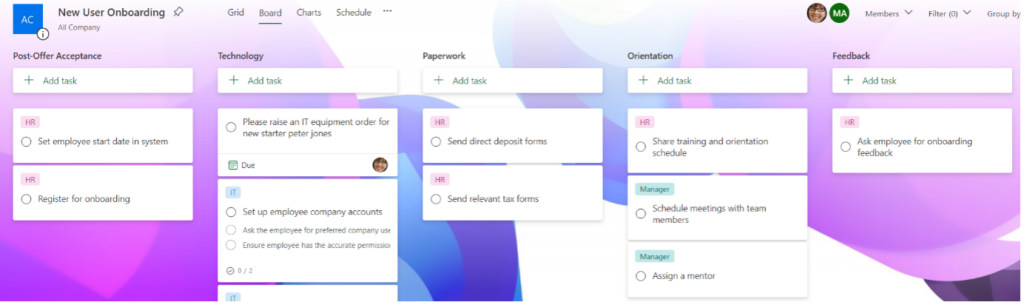
In our process we can assume we have a team of people working on onboarding. To ensure we can automatically assign new tasks to this team we are going to use Microsoft Planner which offers a ‘New User Onboarding’ templated Plan out of the box and is perfect for this scenario. We use this plan to track the progress of onboarding tasks assigned across the team.
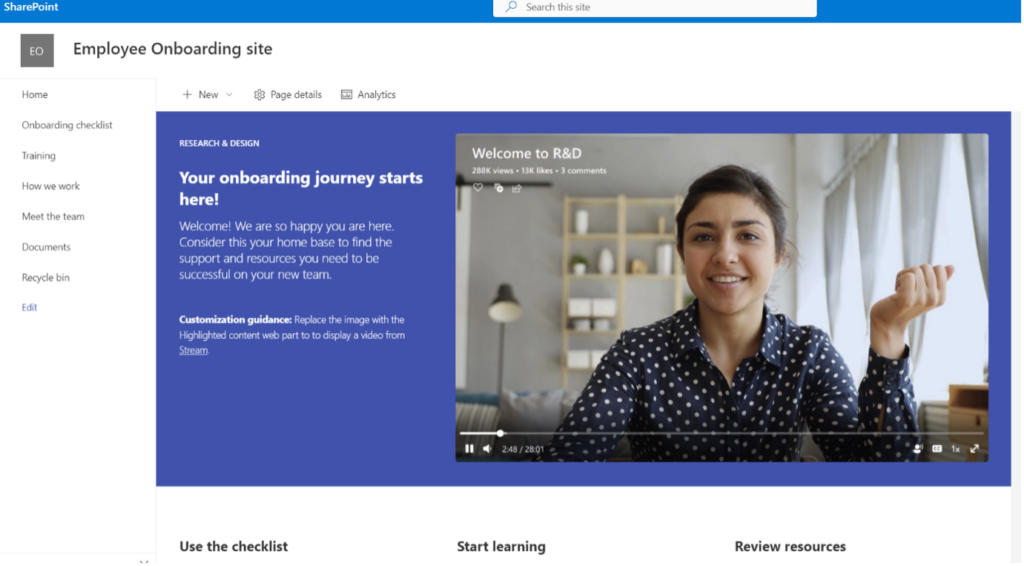
Our last preparation step is to setup a new Sharepoint onboarding site. Sharepoint can act as an important focus point for new employees as by simply using the available templates and selecting ‘New employee onboarding’ site we can very quickly provide the important resources a new starter will require such as resources for Training, Details on how the team and company works, Information relating to the new starters Team and those vital documents they may need in their role and working at the company.
From this point onwards we can go back to Power Automate and start to add all the actions as shown by the initial 10 onboarding steps (shown above). The actions added will connect, add data and collect data from the above resources to automatically manage the onboarding process.
Collect form data
Collect the details form the form submitted using the ‘Get response details’ action.

After selecting the get response details using the Forms option you will be asked to connect and choose the specific form being used.
Identify the department
Now we add a ‘Switch’ to identify what department the new user will be assigned to.
We use this switch to identify the department data submitted on the form request. This is achieved by selecting the ‘Control’ action and using switch. At this point you add the various options required which I have divided into the three different departments found on the Form.

Depending on the department entered we then use the ‘add a row into the table’ action to save the form details within the Master Excel document containing all new user requests. The record created is dependent on the department and the switch action is processed according to the data retrieved be it Graduates, Sales or Marketing. Where the department entered is for ‘Graduates’ this is saved in the Department column within Excel.
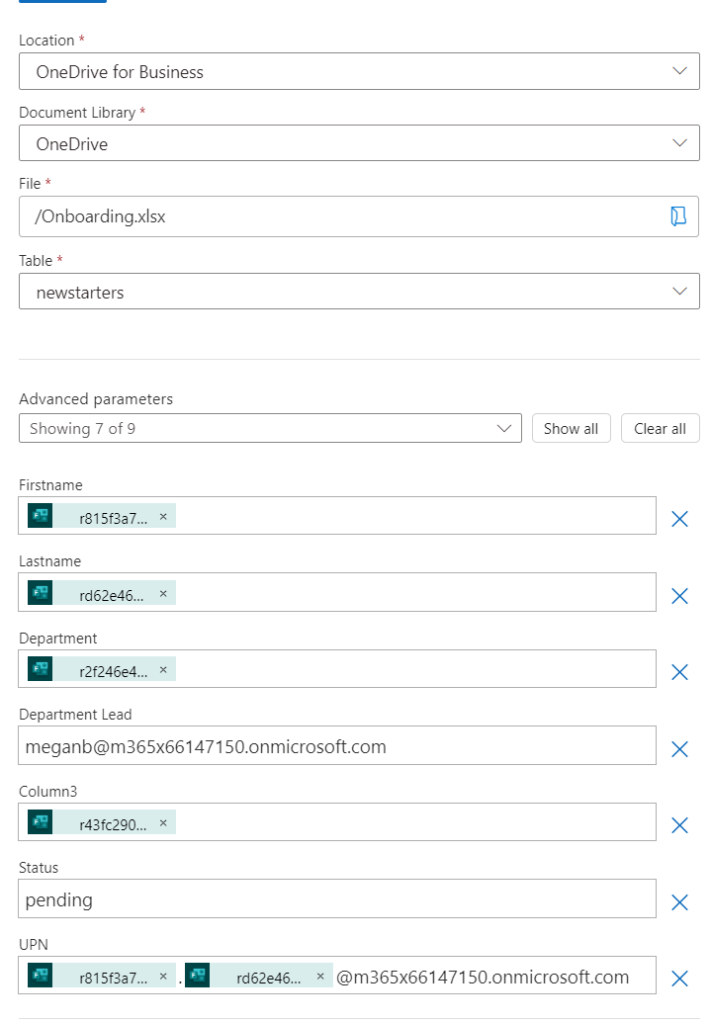
NOTE: The details of the form, where I select the specific document and table. These take the data from the submitted Form and save these into respective fields within the Excel document. For ‘UPN’ I have constructed the users new email address from using ‘firstname.Lastname@Domain’ (This needs to be the domain that you currently own and have configured within Entra. It’s worth pointing out that the ‘Status’ field is also set to ‘pending’. We use this status later to complete the onboarding Flow.
Variables
The Flow then includes a number of variable initialisations by adding multiple ‘Variable’ actions. This can be achieved using functions which use the employees start date collected from the Form and creates an ISO 8601 formatted date and Time. This is required to use with Microsoft Outlook actions otherwise the action will fail.
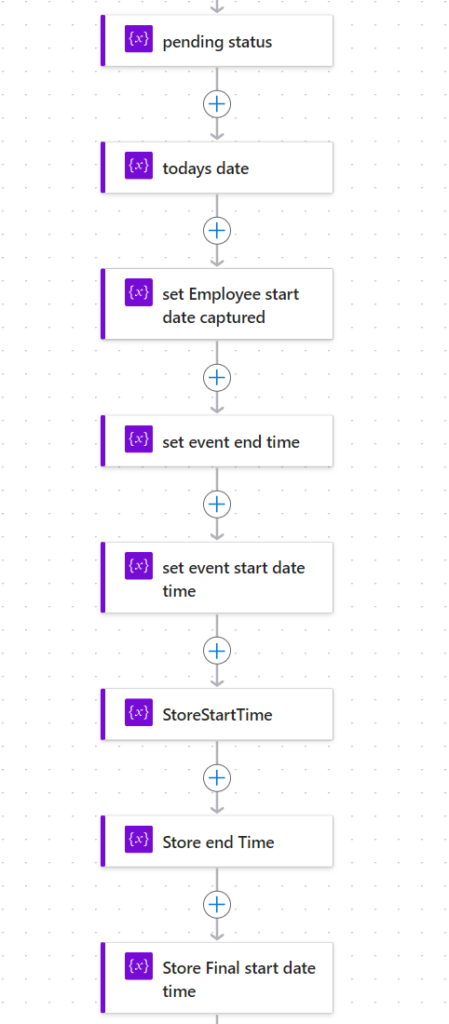
Tip: The date captured from the Microsoft Form is natively collected in a UTC format and does not constitute an ISO 8601 format. This part can be tricky work, so I used a combination of capturing the date, concatenating the date by adding the time in the HH:mm:ss (Hours, minutes, seconds) format, then replacing the included ‘/’ with hyphens ‘-‘.
Delay
After creating the variables I then employ the ‘Delay’ action to pause the Flow for 4 minutes. The purpose of this is to allow for the data written to the Excel document to commit and be made available for retrieval.
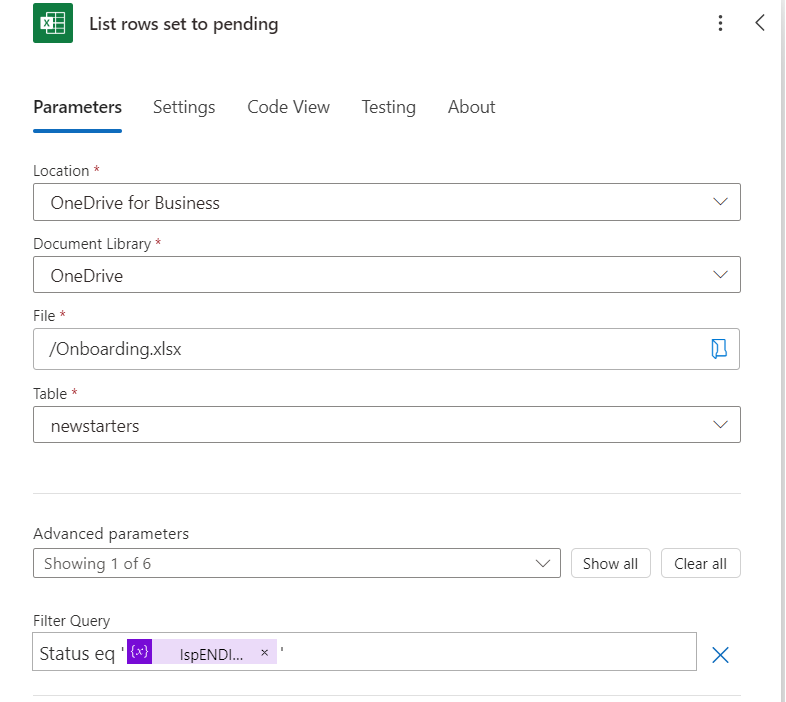
Retrieve ‘pending’ user records
Our next step is to access the Master excel document again and retrieve all records based on a filter of ‘Status eq pending’. For the Filter query I use the variable set previously set with the text of ‘pending’. This is where you can make use of the variables you create and set through your Flow. The reason for collecting all records set as pending is that we want to make sure that we pick up all records set with this status. If required you could split the creation of the new records with the follow on actions into a separate FLOW in which case the next steps need to pick up all records available for follow up automation steps.
The for each loop
Its at this point we can continue to start assigning tasks, creating a new Entra ID for the employee, send some emails, calendar invite and finally set the employee record to complete. Before we process these however I have included a ‘For each pending record’ action. As we may have multiple records to process we need to loop through each of these which match the get rows action configured with ‘pending’. The parameter for this action is the data retrieved from the excel document.

Approval time
Next up we want to make sure that the tasks and records being created are all valid and that the assigned manager of the new employee approves the automation. Remember by approving this the account will be created and licenses assigned as well as other onboarding tasks created and assigned, so we want to make sure it should be approved first. The assigned manager is determined by the original Department chosen on the input Form and then recorded on the master Excel document.
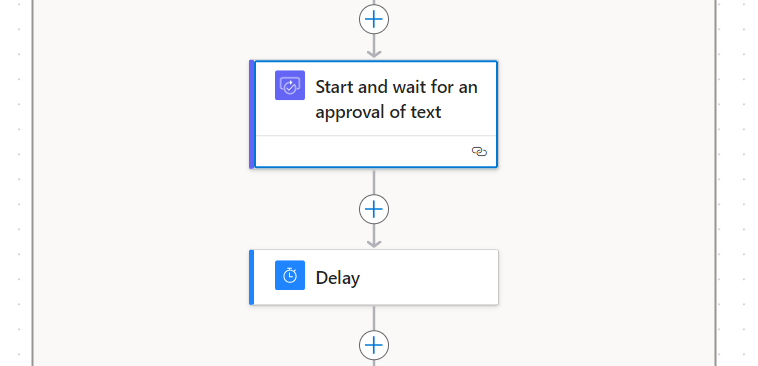
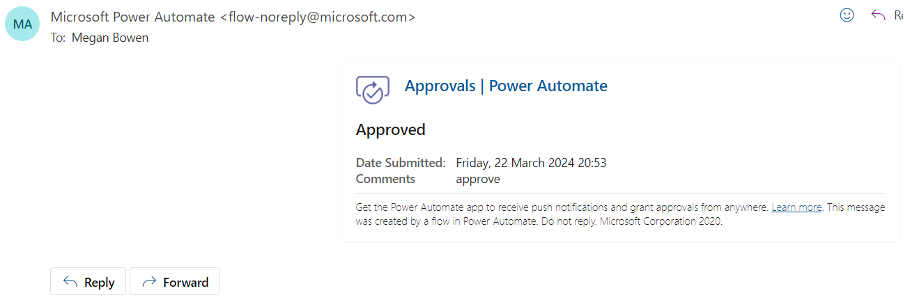
The details of this action can be seen below. Notice we set the ‘Assigned To’ field which needs to include the assigned manager email which is taken from the excel document collected row. The result of this is that an email is sent to the manager which allows them to ‘Approve’ or ‘Reject’ the request and add comments. Once the email is received the manager responds using the ‘Approve’ or ‘Reject’ button. If approved the email is saved in outlook as below.
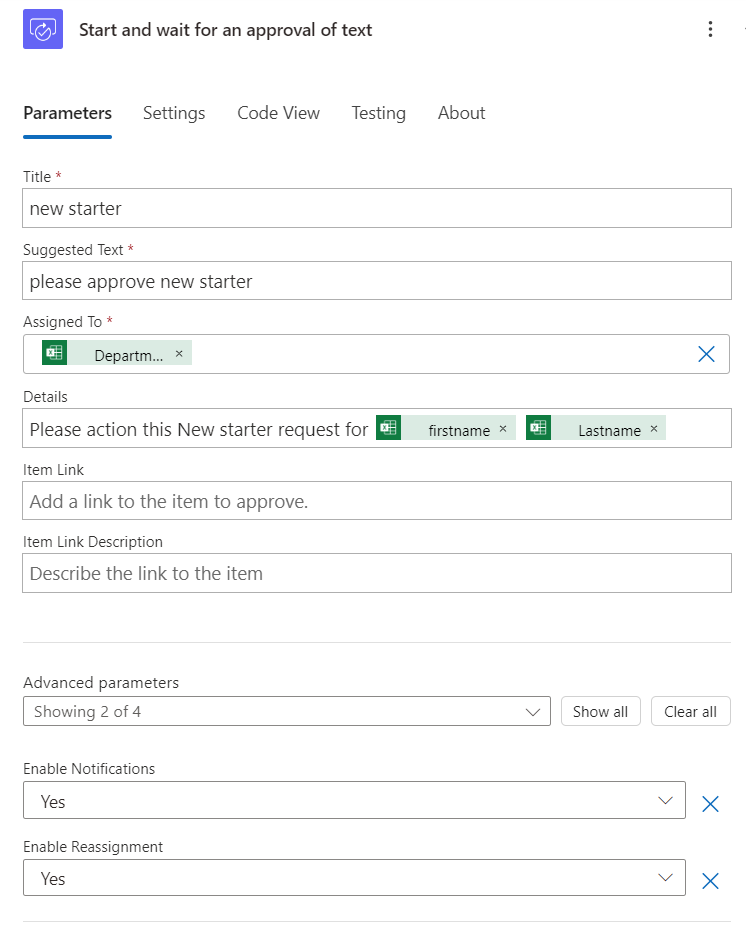
Details configured within the approval action.
Following this we add another ‘delay’ action which allows for the delay in the manager approving the request and the data being retrieved back within the Power Automate Flow.
Evaluate the approval
Assuming the manager approves the request this sparks the remainder of the actions aligned to this automation. We test the reaction by adding a ‘Condition’ action which evaluates the approval request and then the follow on actions.

The configuration used within the condition includes 1 or more condition expressions to evaluate the results. Here we use the Outcome from the condition and test if ‘is equal to’ ‘Approve’.
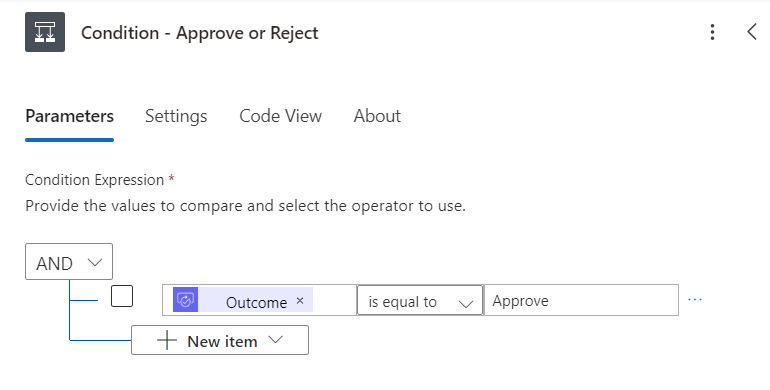
If true we continue with the remaining actions otherwise update the Master Excel document for the selected record as ‘Rejected’.

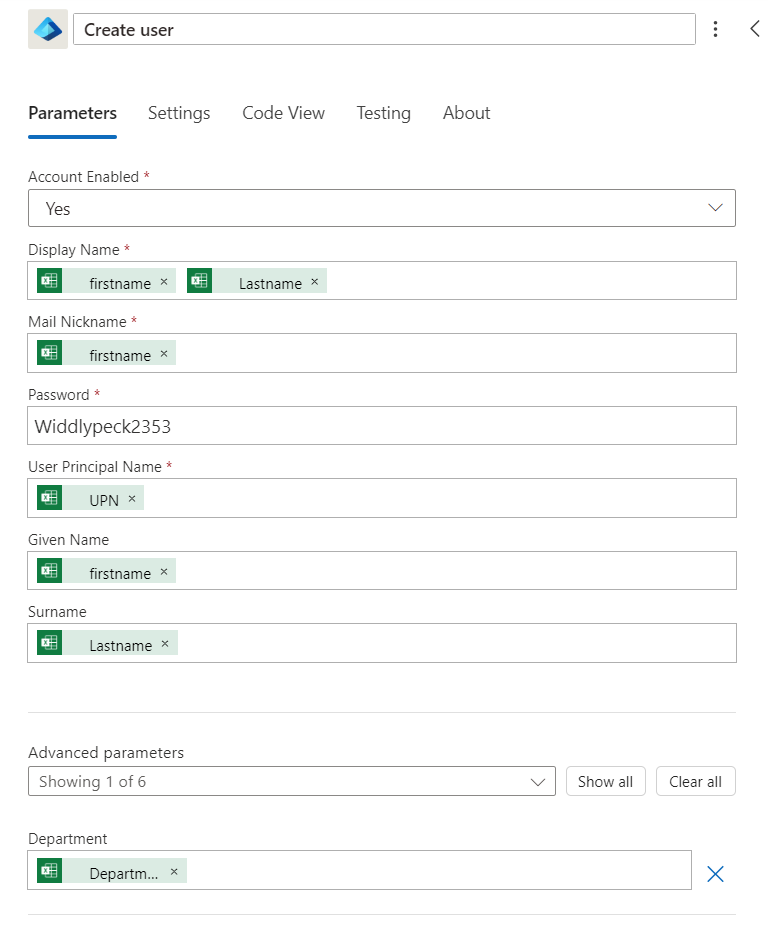
Creating the new Entra ID user account
Following the line of actions under the true tree above, the first action to setup is create a new user account. This is where we connect to Entra and submit the details of the new user. First search for the ‘Create user’ action and establish a connection. The account you connect with needs to have the right permissions to update Entra ID. Once connected you need to fill in the fields you want to setup as shown below. We populate the department on the account with the department recorded on the excel document and use this on the user account. There are additional fields you can configure under the ‘Advance parameters’ dropdown field.
Add a Planner task for the manager
Its at this point we want create a new task for the assigned manager and add this to Microsoft Planner. The specific task is to raise a new hardware order for the new starter. If you remember we setup Planner using the onboarding template which is where it will appear. The task will also email the assigned user that they now have a new task. Again as before, as it’s a new resource you will be required to create a new connection to Planner and select the specific Plan Id you want to update. The ‘Bucket Id’ is the specific bucket of tasks defined within the specific Plan.

Assigned task sent to owner via email.
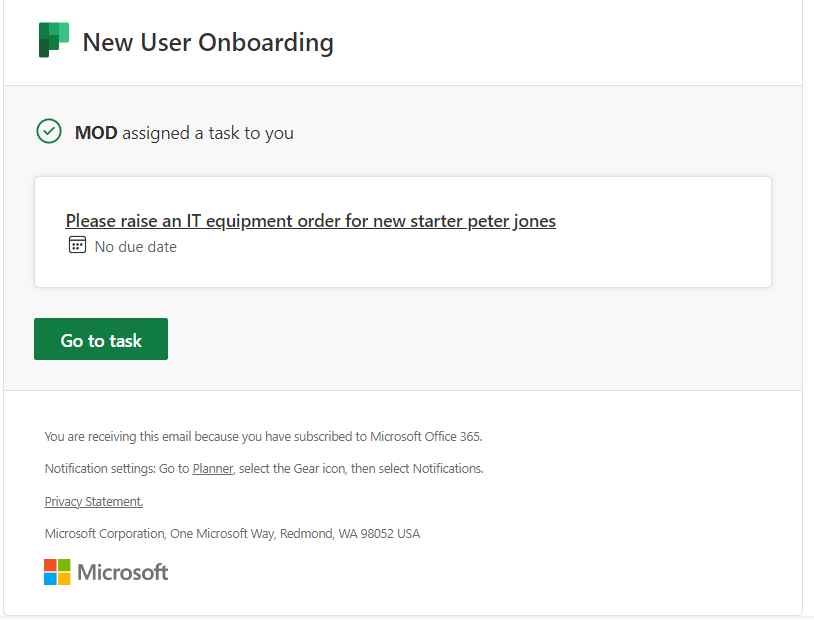
The tasks appears under the selected Bucket Id and matches the text sent within the email
Create List item on the onboarding Sharepoint site
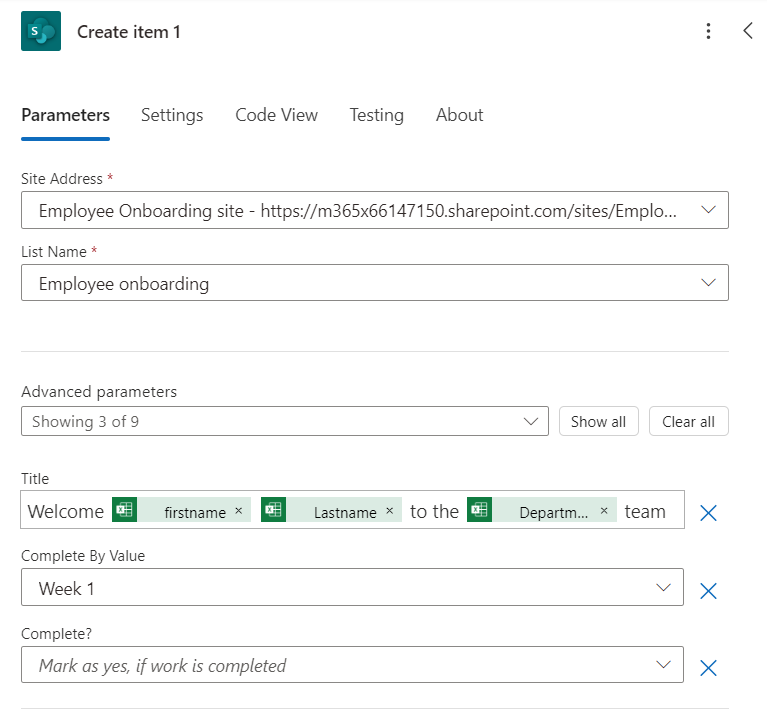
We will now make a new connection to our onboarding Sharepoint site, retrieve the available lists and create a new list item. Using the Sharepoint site setup in the pre-requisites we will need to first setup the new connection and choose the appropriate Site address and correct List name. The Onboarding Sharepoint template offer a number of resources including a list which here is called ‘onboarding checklist’ and is where we will add the item. Specifically the purpose here is raise awareness to people accessing the site that a new user is starting the company.
Flow actions:
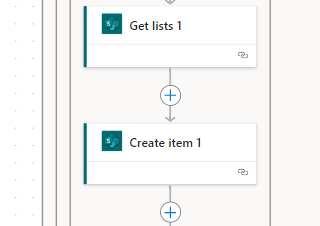
Get List Flow action

Create Sharepoint list item action
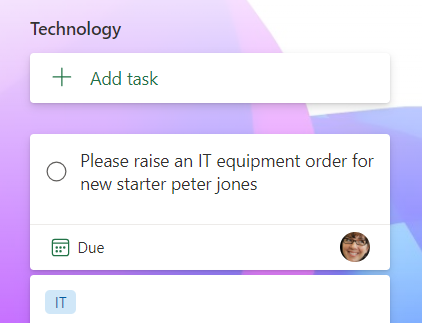
This results in the list item appearing on the Sharepoint site

Delay, Email and Calendar invite
We are nearing the end here so keep going, it’ll be worth it.
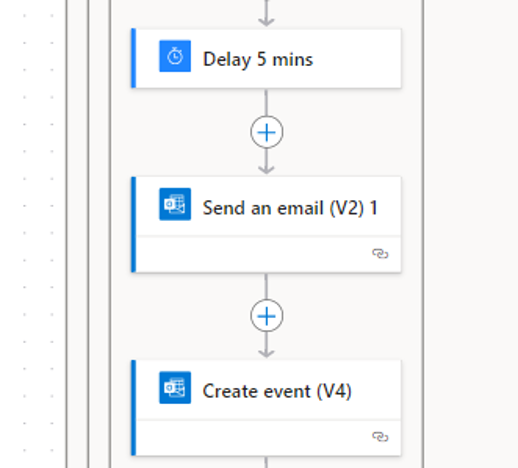
I have added a new ‘Delay’ action this time for 5 minutes and allow for the list item to commit within Sharepoint then we add two Outlook actions: Send an email and Create a calendar invite.
Create send an outlook email. For this we search for the Outlook action and choose the ‘send an email’ option. Notice form the population of data below this will be used as an introduction email to the new starter so we need to ensure the new account has been created first and the required licenses have been assigned along with an email address saved to the users account. Again we use the data retrieved from the users master database record to complete this email and personalise the information.

We now want to create a calendar invite again for the new starter. We can use the variables for the date/time and user data from the excel document to populate this entry. For this we search the Outlook action and pick the ‘Create event’ option. When creating the invite we obviously need to input the start date and end date which need to correctly be in the ISO 8601 format. We can use the configured start and end date/time saved to the variables. We also need to add the required attendees to the invite which can be selected from the advanced parameters. Other options are also available such as ‘Is Reminder On’, and ‘Body’ where we can enter information about the invite.
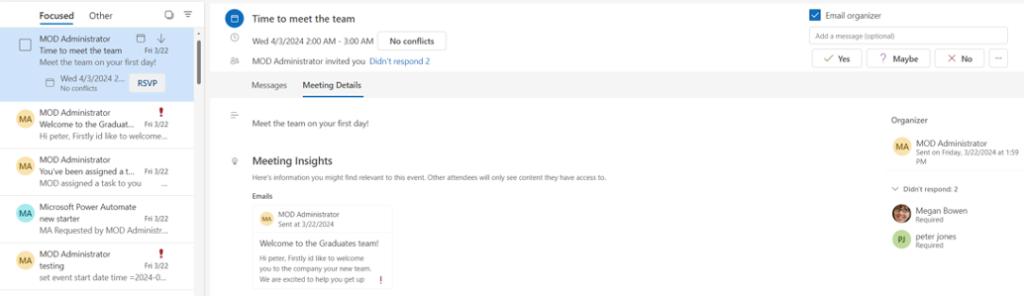
The result is a calendar invite sent to both the manager as above and new starter. When the new starter comes to login to their device for the first time and their device is enrolled into Intune they will receive both the welcome email plus the calendar invite for Meet the Team as shown below.
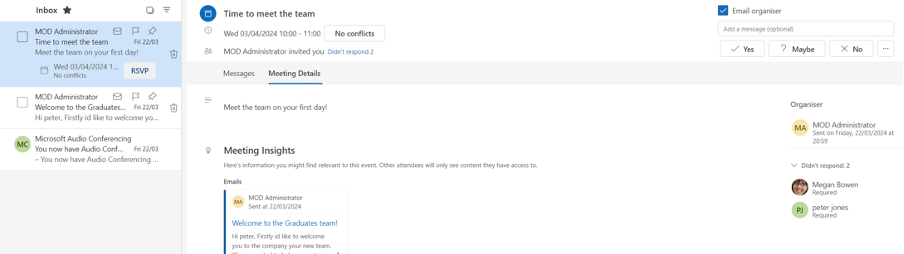
You can see attendees on the right hand side which is Peter Jones manager Megan and the invite has been sent out by the person running the Flow.
Our final action here now that all the actions have been processed successfully we can go ahead and update the master Excel document (new starter records) to ‘Complete’ to show the processing is finished. This is shown below highlighted in red for the Peter Jones record.

That completes the full Power Automate Flow to process the 10 actions depicted. You can split these up into multiple flows if required as there can be delays in between as managers respond and approve. You may want to add additional actions to match your required flows.
By adding these together in a single flow it makes it easier to monitor and review results as well as make changes as required. Keep an eye out for part 2 where I’ll complete a video of the full process and take you though the end to end Flow as it executes.
Hi
May i please have this template
May I please have the template for this as well
Are templates available and can i receive them?
Hi, thanks for the interest, if you still have an interest in this a New refreshed version will be made available this August, see comment to Robert in the comments
This is great, please may I have the template as well. Thank you very much.
Hi, thanks for the interest, if you still have an interest in this a New refreshed version will be made available this August, see comment to Robert in the comments
Hello is it possible to get this template?
Hi, thanks for the interest, if you still have an interest in this a New refreshed version will be made available this August, see comment to Robert in the comments
Hi Everyone
So sorry for the late responses for requests for the template. unfortunately the tenant I originally was using to create this solution Is no longer available and therefore I have had to recreate this BUT due to the many responses/requests I have been working on a much better/bigger solution that includes User Onboarding, Offboarding, Asset management and More……. So please hang tight and i will be releasing this in the next few weeks. I will provide all necessary details for people to use the onBoarding.
I would ask that you visit my new site https://IntuneQLinks.net which includes some great Intune resources. I will let you know when everything is available.
Thanks
Andy Jones
Hi,
great article! Lots of thanks for putting this together. Could you please also provide me with the templates?
Thx in advance!
Hi Robert apologies for the delay in responding and thanks for the interest. Since producing this I have been on a mission to produce a much better solution and am in the process of launching a solution which includes not just onboarding and offboarding but also workflow tracking for the different stages to the process as well as associated Power Apps for the end to end employee life-cycle. Take a look here (https://www.intuneqlinks.net/intunehrflow) for more information. There will also be free power automate flows and associated sharepoint lists you can download from my GitHub site (to be released soon in August). Andy Jones
Could I get a template please?
Hi Sharon, thanks for the interest, a New refreshed version being made available this August, see comment to Robert above
Hello, May I have the template, please.
Hi, thanks for the interest, a New refreshed version being made available this August, see comment to Robert above
Can I have the template ? This is awesome to do
Hi, thanks for the interest, if you still have an interest in this a New refreshed version will be made available this August, see comment to Robert above
Could I also get the template Please?
Hi, thanks for the interest, if you still have an interest in this a New refreshed version will be made available this August, see comment to Robert above
Can I get a template too Please?
Hi, thanks for the interest, if you still have an interest in this a New refreshed version will be made available this August, see comment to Robert above
Can you upload the template please.
Thanks Bader, Happy to provide a template. I will need to do a small bit of tidying up first.
I would love to have a copy of the template too, looks great, Great Job.
Hi!
May I please have the template for this as well 🙂 Thank you!
Hi
May i please have this template