Day #2 and keeping the Techy theme going albeit not Modern device management. I decided to share a project I started last week which involves making what I’ve called NanoBlocks. This is the bit where I say ……with a few twists.NanoLeaf is a brand of RGB colour light panels which come in various shapes and sizes. These can be connected together to form a personal design pattern. They are popular with gamers, streamers and light enthusiasts. In competition to Nanoleaf you have the Colorlight RGB panels which are very similar and allow you create amazing light effects. Each panel operates individually meaning you can have a combination of colours simultaneously.
For added effect as a package the manufactured panels can also be controlled through a mobile App, have and some integrate with Amazon Alexa and Google Home.
After recently seeing my brothers design it inspired me to research these a bit more after which it became apparent how expensive they can be. This made mw think how difficult can it be to make my own. With that in mind, looking on youtube it turns out many people have already done this.
As you may already be aware of you can buy LED light strips at various lengths. These can be used for various things like under Kitchen cabinet lighting. What I wanted though were LED lights which can be individually
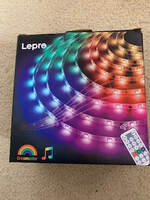
programmed or at least individually controlled. To achieve this you need WS2812b LED Strips which have an additional control chip wired into every LED bulb. I decided for my first project I’d buy pre-programmed Dreamcolor LED light strips from Lepro. They were a good price from Amazon £28 and come with a remote control, multiple light shows built-in and different sound activated settings. You also get x2 5metre strips of light which allowed me to create two separate figures.
So here are the steps to completing my project
Step 1# – Design my boxes
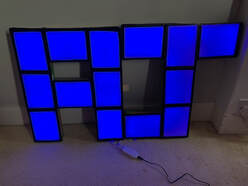
Most designs seem to include either a triangle as with Nanoleaf’s or Hexagons as with ColorLight but I wanted blocks purely because it meant I could create a design for my initials ‘A J’. The idea was I would configure each letter to have its own LED strip.

Step 3# – Connect the Blocks together
For the setup of the ‘A’ I needed x8 blocks. These required connecting together first to make a rigid structure. If I didn’t do that it would make the process of securing the light strips more difficult within the blocks. For this I glued them together using hot glue and a glue gun. I then decided to go one step further and add a wooden frame around the Letter to make it even more rigid plus it allows me to attach it to a wall easier.
Step 4# – Line blocks with tin foil and cut the connecting gaps
Something I learnt from the videos I watched was to line the blocks I created with Tin foil. Why is this , well It serves two purposes. It helps deflect the light from the bulbs within the blocks and also the heat generated from the bulbs, which is good given the boxes are cardboard.
As an alternative to cardboard other people have made their panels using either wood or plastsic. Plastic boxes can be purchased or printed on a 3D printer which does give you more accuracy with sizes.
As shown in the picture once you lined the blocks, cut a strip out of the sides for where you connect the LED strips from one to the next box. As I used a single strip of lights this was necessary.
Step 5# – attach the LED lights within the box.
The next step was to insert and attach the LED strip lights into the blocks. For this I started at the initial entry point on the bottom of the ‘A’ as this meant the hanging power cable descends down from that point. The light strips come with 3M adhesive on the back which is necessary as you want to make good contact with the surface of the shape to ensure it stays in place. When attaching the lights work your way around one side of the blocks then loop back round until both sides of each box if covered. I attached the lights approx half way down the inside of the box but you could go higher or lower. For some shapes you may need to add additional fasteners or even more glue on the back. Its best to line out the pattern before attaching them to make sure you have enough length to fill each block. For me I had a little bit left over which meant I could cut this off as the length is adjustable.
Please Note to make sure the connecting end of the strip is the last section to be attached and either sticks slightly out the nd of the shape or through the back if you’ve allowed for this.
Step 6# – Add a cover to the front the shape (blocks)
Almost there. The final step was to attach a front cover to the boxes. For this I used Polystyrene insulation sheets from B&Q. you get more than you need as you get 9 sheets and they are only 3mm thick. I watched a number of videos on this and the sheets need to be thin enough so the lights are bright enough to shine through. I cut the front panels to size then glued them to the tops. I did find though as they were thin I needed to tape over the joins between the blocks which actually turned out better as it adds a divide between them and I think makes for a more pleasing look.
And finally all I needed to do was connect the lights to the control box and power lead and switch them on. The resulting effect can be seen at the top of this post. I Would have liked to add a video of them working here but that wasn’t possible on this site. You can find a video of the final build on Instagram here: https://www.instagram.com/p/CL1Ctf6hRE-/I did then go on to make the ‘J’ Letter and attach the second LED strip of lights then connect the two letters together.
I hope this helps someone out there wanting to do something similar and obviously let me know if you have any questions.
Happy Making.