
The Microsoft authenticator app that we know and love has been around for some time now and it gives us an additional layer of security to Azure AD working school accounts and our Microsoft accounts. When using the app it allows users to authenticate in a passwordless way when signing in but also as an additional layer of verification to SSPR or self-service password reset and also during an Azure AD MFA event.
The big news though is that Microsoft have now gone one step further with their latest release and have introduced some new security features for iOS and Android devices which includes 1 – The number matching experience with push notifications 2 – Additional context to authentication where it gives you information about the app and location the person is logging in from.
Example of Number matching

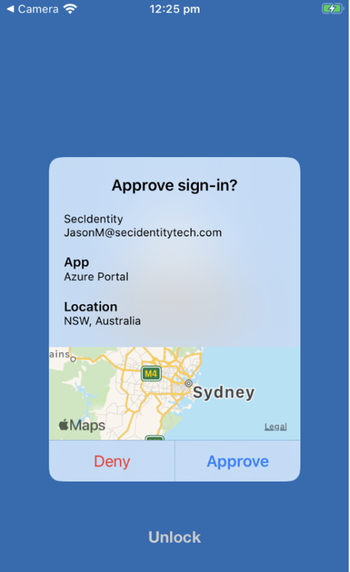
Example of Additional context
In the blog today I will be covering how you set these features up and finish by showing what this all looks like from an end user experience. I like first though to reference my blogs and video using the Microsoft websites as they are the source of configuration. Use number matching in multifactor authentication (MFA) notifications (Preview) – Azure Active Directory – Microsoft Entra | Microsoft Docs
A few key points taken from the Microsoft website are that ‘Number matching is a key security upgrade to traditional second factor notifications in the Authenticator app that will be enabled by default for all tenants a few months after general availability (GA)’
Currently, at the time of writing this the feature is in preview so i recommend going into your azure tenant and turning this on to test. I will cover how to do this later. From a pre-requisites point of view you will need to enable Authenticator (traditional second factor) push notifications for some users or groups using the new Authentication Methods Policy API.
There are multiple scenarios where Number matching is supported. These included:
- Multifactor authentication
- Self-service password reset
- Combined SSPR and MFA registration during Authenticator app set up
- AD FS adapter
- NPS extension
Number Matching can be used to target either single, dynamic or nested group and supports both on-premise synchronized security groups and cloud-only security groups. There are essentially 2 ways to enable this feature. Firstly using the MS Graph explorer and api route by changing the two settings:
– MicrosoftAuthenticatorAuthenticationMethodConfiguration setting to enabled
– MicrosoftAuthenticator includeTarget
Take a look at the included Microsoft website above for details on the properties for these.
Or alternatively and much easier in my view is to use the Azure portal. Enable number matching in the Azure portal
Follow these steps to enable Number matching within your Azure AD portal.
1. Login to the Azure Portal using an Admin account
2. Selct Security > Authentication methods > Microsoft Authenticator
3. Choose your target users and click the 3 dots on the right then Configure.


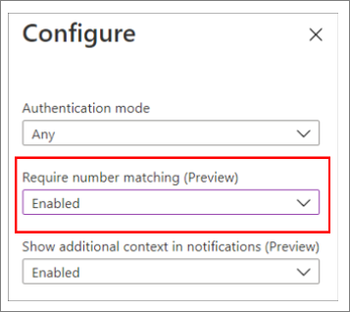
Go ahead and switch ‘Enable‘ to ‘Yes‘ and select your target users by selecting ‘All Users‘ or ‘Select Users‘. In my case i’ve selected a specific user group and the reason for that is i’m going to demonstrate this working across two different users, one for number matching turned on and the other with it turned off. As this is still in preview I recommend using select users at this stage. By clicking on the 3 dots and select ‘configure‘ you’ve got additional options for the authentication modes. By selecting ‘Any‘ you are enabling both passwordless phone sign-in and traditional second factor notifications. To ensure you then turn number matching on you then need to set the ‘Require number matching (Preview)‘ to Enabled‘. The last option here is for additional context in notifications (Preview). Again this is an In preview feature still but go ahead and set this to ‘Enabled‘. This feature provides details about where a person is logging on from and presents the user with a little map of where that that person is logging in from and the application they are logging into which is extremely useful especially if its not you initiating the login.
End User Experience
So as you remember I am testing 2 accounts here, one with number matching and additional context switched on and a different user account with these switched off. I have mirrored my Iphone here to show the experience.
– Within the Windows browser I will login to https://login.microsoftonline.com.
– This will present me with entering both my account and password.
– Enter crendentials which will inform me to approve the sign-in request using the Authenticator App
– Then finally I am authenticated onto the Microsoft website
Experience with settings switched off.


For our second test account we will go through the same test and see the changed experience.
– Within the Windows browser I will login to https://login.microsoftonline.com.
– This will present me with entering both my account and password.
– Enter crendentials which will inform me to approve the sign-in request using the Authenticator App BUT this time In presented with a random number for ‘Number matching’
– You can see from the picture below 1. I am asked to use the random number to sign-in 2. It shows the App being accessed 3. The location the request is coming from 4. Where to enter the number
– You enter the provided number 68 and select the ‘Yes‘
Then finally I am authenticated onto the Microsoft website
Experience with settings switched off.


So there we have the two experiences after going through and configuration. Number matching and additional context clearly adds a welcome layer of security plus also making the experience more user friendly.
Thanks very much for getting to this point in my blog. Give this a go for yourself and switch it on and by all means let me know how you get on and if you’ve got any queries please let me know in the comments.